Here is a great time lapse movie from Erik West:
The tilt shift effect was added later in post.
Thursday, February 26, 2009
Tuesday, February 24, 2009
"deshake" a time lapse sequence taken in windy conditions
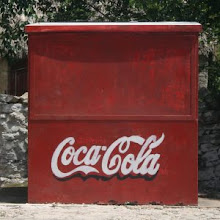
In Barcelona I shot some time lapses in very windy weather and I only had the gorilla pod as a tripod with me. The result makes you seasick when watching.
Here is a still from that sequence: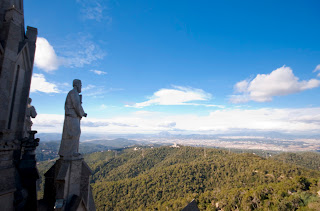
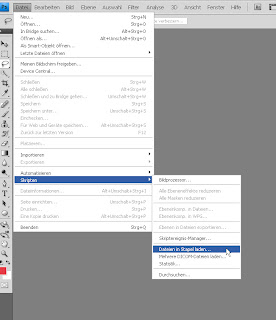
Luckily, there is photoshop with its great "auto align" function. This will nicely deshake the movie. To use it, proceed the following way:
First load all the images as a stack into layers (File... Scripts... Load Images into Stack)
Then use Selection... Select all layers
The auto alignment dialog is opened with Edit... Auto Align Layers
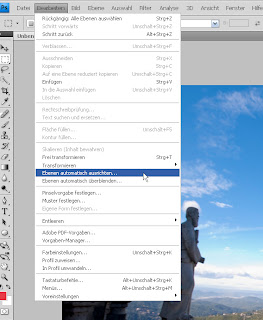 With the selection of Auto:
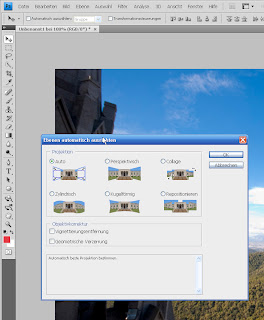
and clicking on "ok", the alignement procedure starts. Depending on the amount of memory you have and the number of images to align, it takes very very very long. Reducing the size of the images speeds the process up by a large factor.
When it has finished, you can save the single layers again into seperate images with File... Scripts... Export Layers as Images...
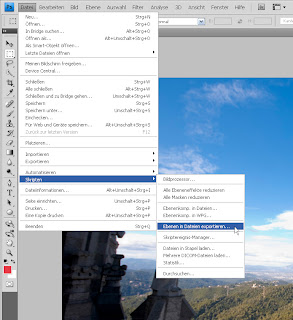
Then choose a folder and an image format.
Here is the result of the raw and the deshake barcelona movie:
www.magictimelapse.ch
Here is a still from that sequence:

Luckily, there is photoshop with its great "auto align" function. This will nicely deshake the movie. To use it, proceed the following way:
First load all the images as a stack into layers (File... Scripts... Load Images into Stack)

Then use Selection... Select all layers
The auto alignment dialog is opened with Edit... Auto Align Layers
 With the selection of Auto:
and clicking on "ok", the alignement procedure starts. Depending on the amount of memory you have and the number of images to align, it takes very very very long. Reducing the size of the images speeds the process up by a large factor.
When it has finished, you can save the single layers again into seperate images with File... Scripts... Export Layers as Images...

Then choose a folder and an image format.
Here is the result of the raw and the deshake barcelona movie:
www.magictimelapse.ch
Saturday, February 21, 2009
Swiss Winter time lapse meditation
Here is a new time lapse movie with footage I collected on backcountry skitours in the Alps ( or rather from the foothills of the Alps). This one I shot completely in raw, and no HDR processing.
Tuesday, February 17, 2009
Tutorial: How to create a HDR time lapse
In the last few years, HDR (High Dynamic Range) photography evolved to a serious photography technique. Here an example which is slightly over the top, which I made in 2006 from the telescope I write my phd thesis about. HDR gone bad: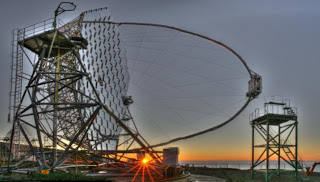
and another one from Agua Azul in Chiapas, Mexico. Kitsch as kitsch can:

Once one gets over the initial phase of playing with the settings and going to the crazy settings resulting into the images above, one can achieve great results.
Technically, HDR images are taken using the bracketing mode, which is included in all DLSRs and even some compact cameras. One takes for example 3 images from the same scene but with different exposure levels. Thus, the dynamic range of the image can be increased, which is great for difficult light situations with lots of light and shadow. Using special software like photomatix or photoshop, one can put together the 3 brackets into one HDR photo. Unfortunately, the dynamic range of the resulting image is too large (32 bit depth) to be displayed on a screen or printer. What one usually does is mapping the image down to 8 bit jpgs by using tone mapping algorithms, which keep the local contrast but reduce the total dynamic range of the image. As displayed in above images, these algorithms unfortunately are prone to artifacts like halos, especially if one is not careful and goes over the top.
For HDR time lapse movie, I first follow the general rules of time lapse photography:
Then, I set the camera to bracketing mode +/- 2 EV on the EOS 50D, and to "high speed continuous". In the intervalometer, I use long time exposure, with exposure time at least as long as it takes to take the 3 images from one bracket. (e.g. if the mean exposure time is 1/25 sec, then the underexposed image is 1/100 s and the overexposed 1 sec, so I set the total exposure time on the intervalometer to 2 seconds). With the sraw1 settings, I can take about 3 images in 4 seconds, so I set the interval time such that exposure time + interval time is at least 4 seconds, depending on the subject (for slow clouds 6-10 seconds is fine).
The next step involves waiting for the time lapse series to finish, read a book, listen to music, enjoy the scenery...
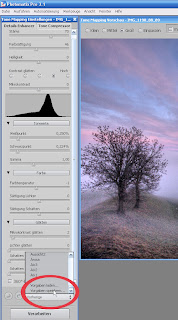
When the card is full (16GB is actually quite reasonable for HDR time lapses, 32GB even more), I go home, copy the card to a disk and start photomatix. I will later use the same tone mapping settings for the whole series with the batch processing feature, so I choose first 3 images from one bracket which is "representative" for the whole series, by clicking onto "produce HDR"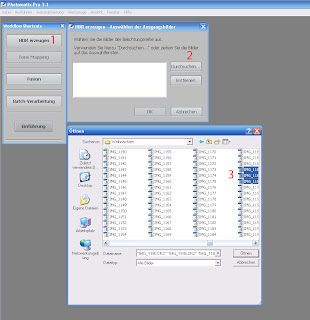
Then twice onto ok until the HDR is created, then tone mapping. Use some decent settings until you like it, then click where I marked it below onto "Save Settings" and save the settings.
Then close the window and the image.
Click on "batch processing", then on "use detail enhancer settings" and with "load settings" load the settings you saved before.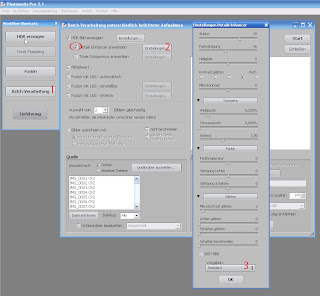
Then click on "choose source folder" and search for the folder you have saved the images. I would save the tonemapped images as 8bit jpgs and choose to remove the HDRs, you won't need them and they need tons of space.
After you finished your settings, click onto run and wait. On my computer this can easily take several hours.
If you are eager to watch your movie, you can use virtual dub to quickly put together the time lapse, but first you need to rename the images such that they are enumbered (e.g. img_001.jpg, img_002.jpg, img_003.jpg etc). For that I use the free program bulk rename utility.
Then start virtual dub, click on file, open video file, choose the first image from your series and "Image sequence" as the file type.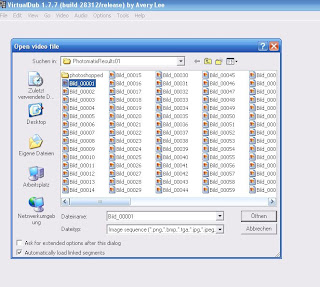
Set the frame rate with Video.. Frame Rate to e.g. 25fps and the Codec with Video...compression to e.g. XviD MPEG-4 Codec. Then resize your images with Video... Filters... Add... Resize to for example 1920x1080. Then save the movie with File... Save As Avi... and wait again a few minutes.
That's it!
An example with mostly HDR time lapses is one from footage I took last summer on holidays in Oregon and California:
www.magictimelapse.ch

and another one from Agua Azul in Chiapas, Mexico. Kitsch as kitsch can:

Once one gets over the initial phase of playing with the settings and going to the crazy settings resulting into the images above, one can achieve great results.
Technically, HDR images are taken using the bracketing mode, which is included in all DLSRs and even some compact cameras. One takes for example 3 images from the same scene but with different exposure levels. Thus, the dynamic range of the image can be increased, which is great for difficult light situations with lots of light and shadow. Using special software like photomatix or photoshop, one can put together the 3 brackets into one HDR photo. Unfortunately, the dynamic range of the resulting image is too large (32 bit depth) to be displayed on a screen or printer. What one usually does is mapping the image down to 8 bit jpgs by using tone mapping algorithms, which keep the local contrast but reduce the total dynamic range of the image. As displayed in above images, these algorithms unfortunately are prone to artifacts like halos, especially if one is not careful and goes over the top.
For HDR time lapse movie, I first follow the general rules of time lapse photography:
- Focus to manual
- Manual white balance (I use SRaw1 on the Canon 50D to be able later to change the white balance when developping the raw images. 7.5 MegaPixel is more than enough for time lapses)
- Manual exposure time and aperture.
Then, I set the camera to bracketing mode +/- 2 EV on the EOS 50D, and to "high speed continuous". In the intervalometer, I use long time exposure, with exposure time at least as long as it takes to take the 3 images from one bracket. (e.g. if the mean exposure time is 1/25 sec, then the underexposed image is 1/100 s and the overexposed 1 sec, so I set the total exposure time on the intervalometer to 2 seconds). With the sraw1 settings, I can take about 3 images in 4 seconds, so I set the interval time such that exposure time + interval time is at least 4 seconds, depending on the subject (for slow clouds 6-10 seconds is fine).
The next step involves waiting for the time lapse series to finish, read a book, listen to music, enjoy the scenery...
When the card is full (16GB is actually quite reasonable for HDR time lapses, 32GB even more), I go home, copy the card to a disk and start photomatix. I will later use the same tone mapping settings for the whole series with the batch processing feature, so I choose first 3 images from one bracket which is "representative" for the whole series, by clicking onto "produce HDR"

Then twice onto ok until the HDR is created, then tone mapping. Use some decent settings until you like it, then click where I marked it below onto "Save Settings" and save the settings.

Then close the window and the image.
Click on "batch processing", then on "use detail enhancer settings" and with "load settings" load the settings you saved before.

Then click on "choose source folder" and search for the folder you have saved the images. I would save the tonemapped images as 8bit jpgs and choose to remove the HDRs, you won't need them and they need tons of space.
After you finished your settings, click onto run and wait. On my computer this can easily take several hours.
If you are eager to watch your movie, you can use virtual dub to quickly put together the time lapse, but first you need to rename the images such that they are enumbered (e.g. img_001.jpg, img_002.jpg, img_003.jpg etc). For that I use the free program bulk rename utility.
Then start virtual dub, click on file, open video file, choose the first image from your series and "Image sequence" as the file type.

Set the frame rate with Video.. Frame Rate to e.g. 25fps and the Codec with Video...compression to e.g. XviD MPEG-4 Codec. Then resize your images with Video... Filters... Add... Resize to for example 1920x1080. Then save the movie with File... Save As Avi... and wait again a few minutes.
That's it!
An example with mostly HDR time lapses is one from footage I took last summer on holidays in Oregon and California:
www.magictimelapse.ch
Sunday, February 8, 2009
New time lapse: Winter fog
A new time lapse I shot in the beginning of this year in or slightly above the fog. I used the image bracketing technique (each frame consists of 3 different exposures with each 2 stops apart) to increase the dynamic range of the scenes. Soon, I will write a little tutorial on how to shoot HDR time lapses.
Watch it in high definition on vimeo:
http://vimeo.com/3128079
or youtube:
http://www.youtube.com/watch?v=NmWkJNIk1uw
(To see it in HD on youtube, you have to select "watch in HD" below the movie window.
Watch it in high definition on vimeo:
http://vimeo.com/3128079
or youtube:
http://www.youtube.com/watch?v=NmWkJNIk1uw
(To see it in HD on youtube, you have to select "watch in HD" below the movie window.
Saturday, February 7, 2009
Batch remove sensor dust in images (photoshop)

In the last sequence I took around Christmas 2008 with my old Canon EOS 400D (XTi), I realised that there was lots of dust spots in the images. Unfortunately, the HDR processing amplifies these dark spots even more. Luckily, the spots stayed for the whole series at the same position.
To remove the dust, Photoshop has a nice filter (filter... noise filters... dust and scratches). However, if this is applied to the whole image, it will become fuzzy. To prevent this, I followed these steps:
- Use Layer... dublicate layer.
- On the dublicated layer select all dust spots with an Elliptical Marquee (tools). If there are several spots, use the SHIFT key to select all spots.

- In the layer window use Add Layer Mask...

- In the Layer window: Click onto the small image in the background copy to unselect the layer mask. Then use the filter in: filter... noise filter... dust and scratches filter... Leave the threshold at 0, and change the radius until the dust is gone. Values around 20-60 are usually fine.


To batch process the dust removal, you can define an action. Do not forget to save and close the image at the end. I then use Adobe Bridge, mark the images I want to batch process, go to Tools... Photoshop... Batch to run the action defined before, and change the target to the path I want to save my images.
Here you can download the action. To customize, you have to change the settings of the filter and the selection of the dust spots.
www.magictimelapse.ch.
Subscribe to:
Posts (Atom)